
With the Steam release we will likely see some new designers. I joined EOL after a decade of having the game and immediately started making levels for battles in March 2018, I had made levels 10 years ago, but this was a new beginning. This gives me a unique look into how starting to make levels as a new player feels like. There is a lot to learn when it comes to making levels, from actually putting polygons into a level, to the tools you can use, to the etiquette and most importantly the picky tastes of the battlers. I'll give some information here to help make becoming a master levmaker easier.
Table of Contents
Guide to making levels with SLE
Guide to starting battles
Advanced tips in SLE
Guide to Level Making and Battle Starting for new players
Moderator: Moporators
Guide to Level Making and Battle Starting for new players
Last edited by tej on 26 May 2020, 22:14, edited 3 times in total.
Re: Guide to Level Making and Battle Starting for new players
Making levels
Making a level in 2000 meant opening up the main menu of elma and going to the Editor button the bottom. This editor is great for many, and served its purpose, but really could have used some quality of life improvements. Luckily for you, it is 2020 and you can use an external tool to make levels. Smibu has created a tool called SLE (Smibu Level Editor) and it is simply fantastic.
To get the tool go to his GitHub page and download it from the Releases tab: https://github.com/Smibu/elmanager.
The benefits of this tool are endless, but significantly it will show you the level with all the graphics and pictures, making placing these things much easier. It also has tools to create different shapes, copy and pasting, resizing, and more. I highly recommend making levels in SLE.
Using SLE to make a level
If you want less instruction, skim through this. Come back to it in a few months and you may be surprised with stuff you don't know!
Start by opening SLE and you'll be shown a new level. A square with the start and finish.

Using your creativity, you're going to design the level. I'll show you the steps to create a simple one, and some tips that will help you along the way, like tools and their hotkeys.
To move your view around the screen use the scroll wheel to zoom in and out, and click your mouse wheel and drag to move your view around. (You can also use arrow keys to move the camera.)
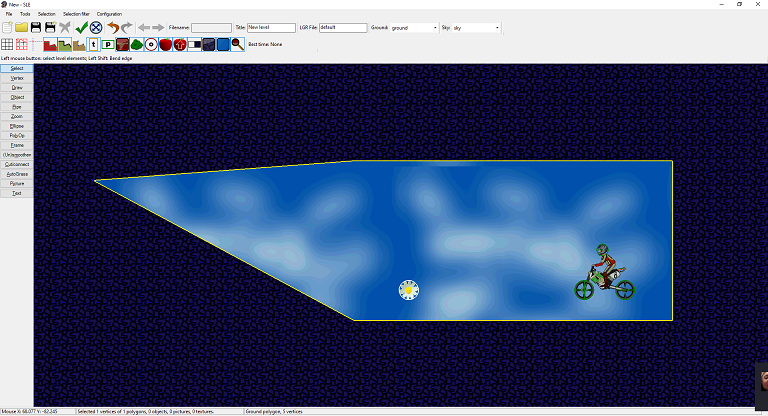
We'll start with the bend tool, it allows you to change the shape of a polygon. If you hover over a polygon and click and drag, it will move the polygon. To bend an edge, you hold SHIFT while you click. I will SHIFT+CLICK the left edge and drag left.
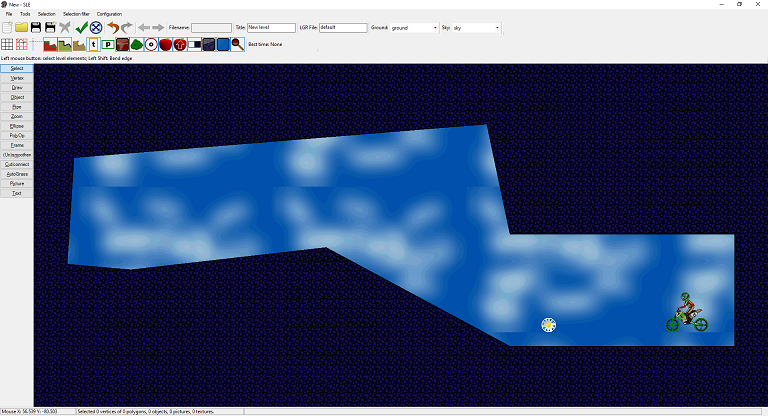
I'm going to do this a few more times and make a bigger area.

Great. Now I will move the flower. You could click and drag the flower to wherever you want it to go. I want to test my level, so I'm actually going to just move it out of the way. I do this almost every time I make a level, because without knowing how big the level will be I might as well get the flower out of the way.
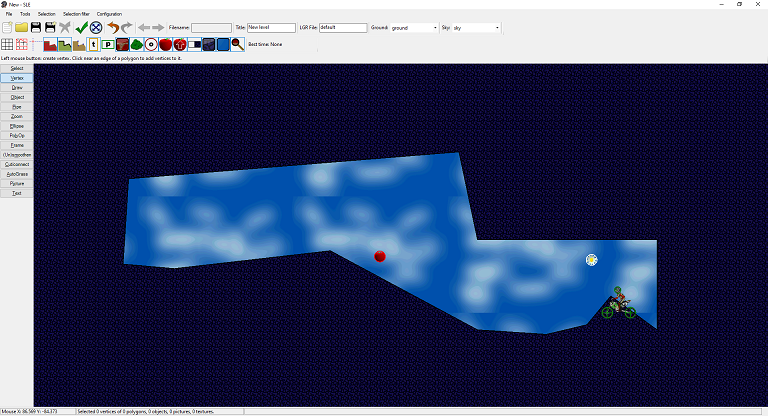
I'm also going to place an apple. To do this click Object on the left side of the screen, or press O. This tool allows you to place Killers, Apples, and Flowers. To swap between them press SPACE. Once you have the apple on your cursor, you can click to place it.

You can see the apple I placed on the right and the one on my cursor as well. To get rid of the Object tool you can press Select on the top left, or S.
Alright, amazing. Now let's learn about the Vertex tool. I want to raise the elman onto a bit of a launch ramp to start the level with some speed. Click Vertex on the left or V. This tool works by selecting an edge and clicking for each new vertex you want to appear. We'll start by clicking on the floor below the biker.

Great, see that red line? That's the section that won't be locked in when you click. So, if you were to click where my mouse is right now, it would act as if I was using the Vertex tool on that red section, next. But, I want to go the other way, so I have to swap the red section to the right side of my mouse. To do this press SPACE.

Great. Now I'll click on all the spots I want to put my verteces. One, two, three.
Now, obviously, the biker is in the ground. We want him to start in the air, so, I'll click and drag on him and to move him.
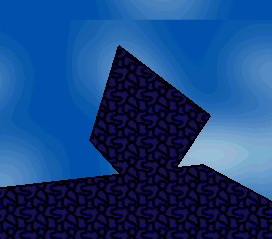
We've learned how to change the shape of the level using the bend tool, as well as the vertex tool. There are more options, though! Next we'll create a new polygon. To do this, we'll use the Vertex tool again. This time, instead of clicking the ground, click the air and make a shape.

That's beautiful, but what if I want it to be a part of the ground? To do this use the difference tool. These tools can be accessed by opening the Selection menu in the top of the window (not the Select tool on the left).
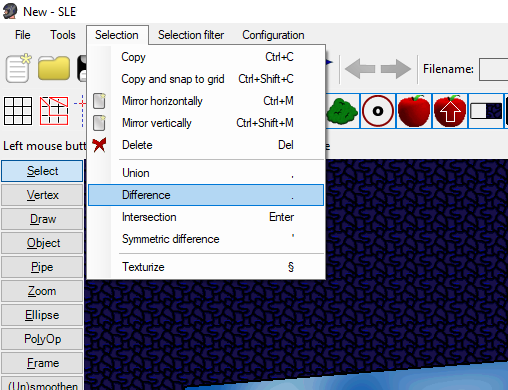
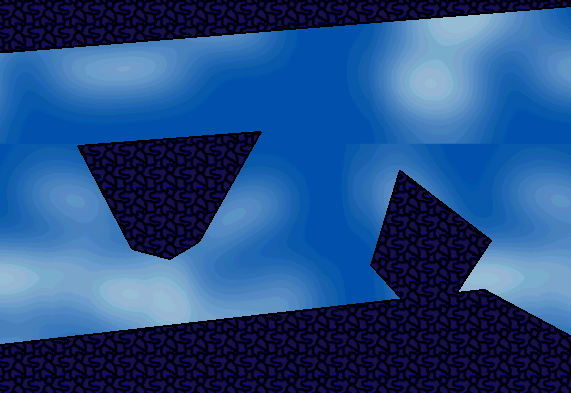
The hotkeys for these tools are , (comma) and . (period) and ENTER. For difference we use period.

Press period.
Using these tools you can cut shapes out of other shapes and add shapes to shapes. Something you could never accomplish in the internal editor! (I'm not kidding)
Ok let's finish off this level. Only a few more steps.
First I'm going to add another polygon.
Now let's talk about grass.
Grass is created using polygons and then toggling those polygons into grass mode. How it works is not overly complicated, but can take some getting used to. Here's my first grass polygon, but I haven't turned it into grass mode yet. Just look at how I place it.
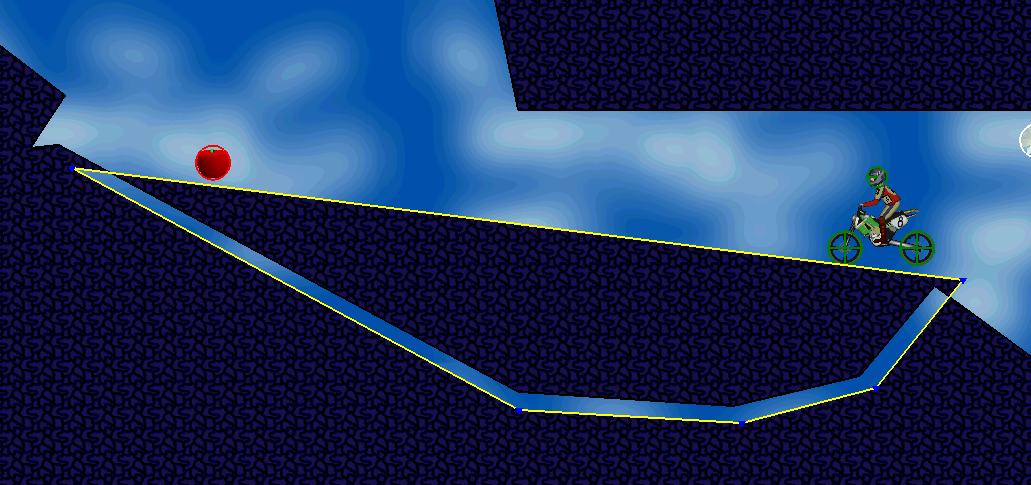
I put a vertex of the grass polygon below each of the verteces in the ground. Then, I just left the top completely flat. This is important. How the grass tool works is that once it's a grass polygon the LONGEST line is ignored. Watch what happens when I right click my polygon and turn it into grass.
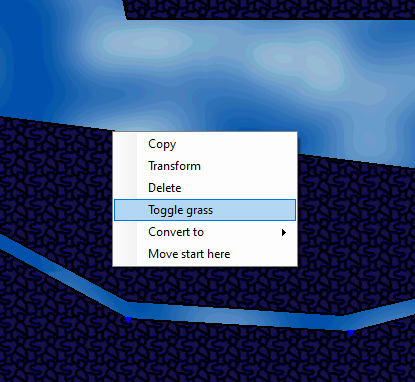
And it becomes:
The top line is gone!
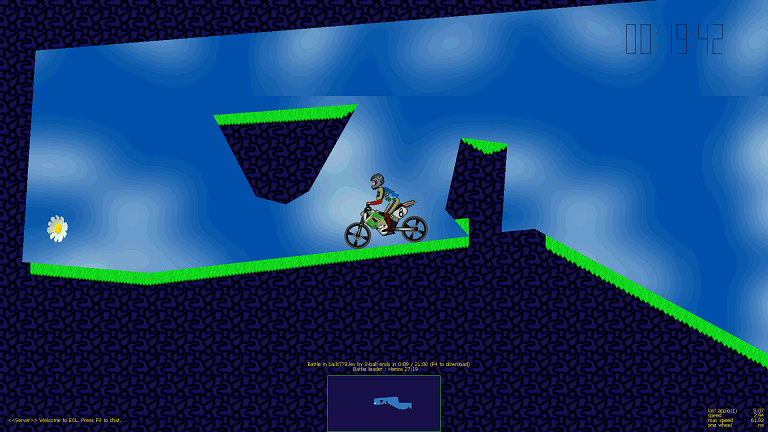
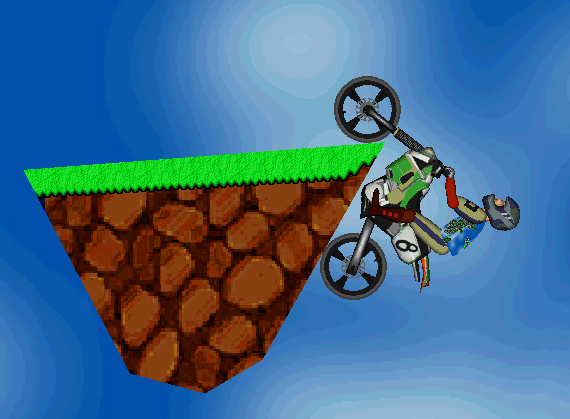
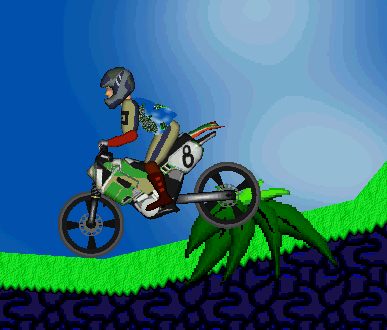
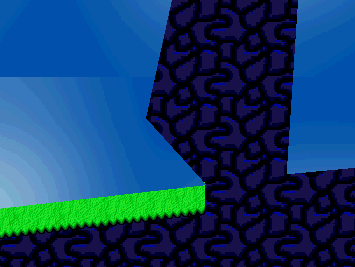
Now, when we see this polygon in game it looks like this.

Note how the grass grows "upwards" from where you put the polygon in the ground. Experiment with this and you can make some cool and beautiful grass! Many elma players don't care for grass, but don't let them get to you, the better your levels look the better they are (this is sarcasm, ArzeniK ).
).
Now, I noticed while testing my level that it was really hard due to the polygon at the top of the hill. How do you test your level? Very good question, I have all sorts of tips. I'll get to them shortly.
I reshaped the polygon to look like this.
Now let's add the rest of the grass and move the flower to the left side.
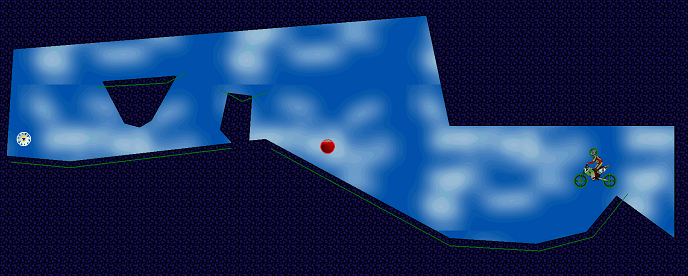
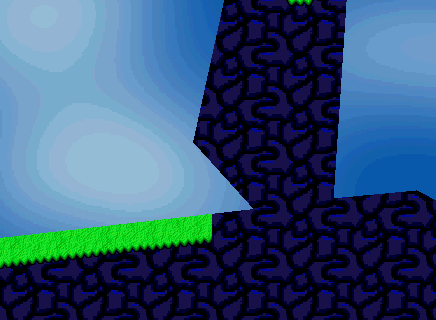
Let's see that in game.
Looks pretty good, but what happened to that one bit of grass that's growing in the side like that? What happens is elma doesn't know what to do because it's simple and you need to tell it how it should be. There's two good options here. I'll go over the easier one.
I've just moved the grass back. You could just click and drag the vertex, but you may want to ensure it stays at the same distance from the ground as before. To do this, using the Select tool, click the vertex and hold SHIFT while you drag it. You'll notice it only moves along one line, as if it's snapped into place. This is a great tool for all sorts of things! Anyways, here's how it looks in game.
Interested in a different way to fix this problem? See Advanced tips
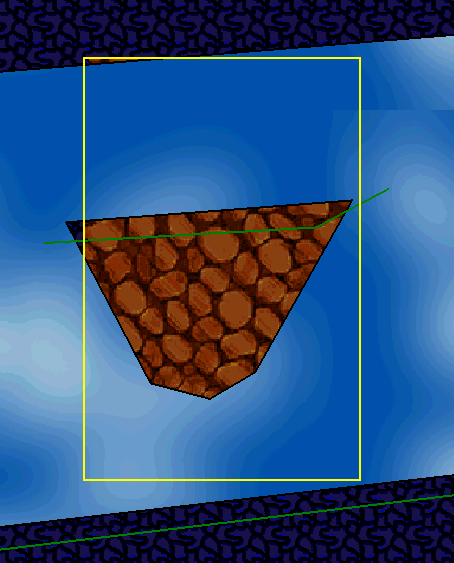
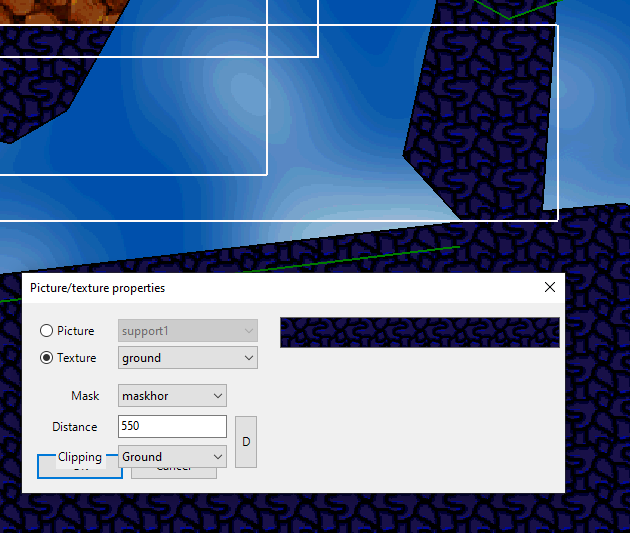
That'll do. Almost done. Let's add a texture to the floating block.
Click Picture on the left, then click on the level view to make this menu appear.
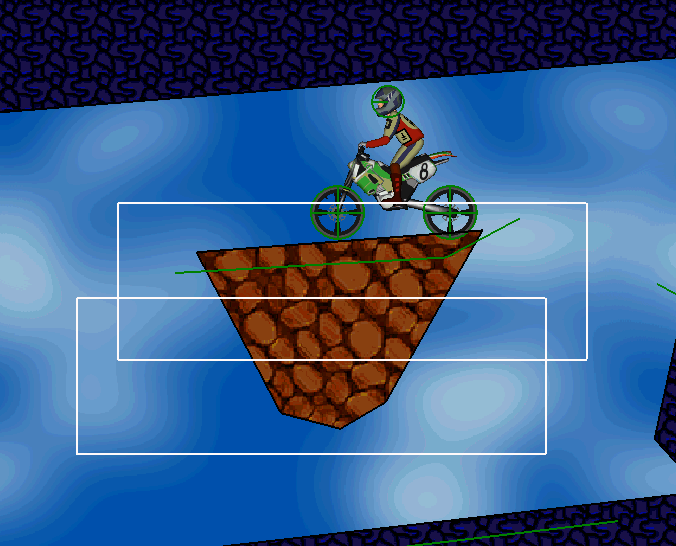
This menu allows you to place pictures and textures. First we'll do a texture. Select the Texture radio button and then choose stone1.
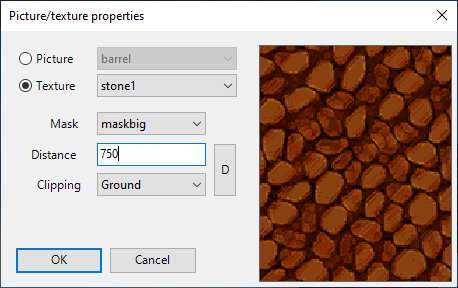
The Distance value is important, it determines which stuff appears on top of which stuff. The larger the number is, the farther back it will appear. Or, in different words, the smallest number appears on top, hiding the stuff with larger numbers. An important note is the biker appears at 500, so anything above 500 will appear behind him.
Quickly, let's just place a texture and then get back to talking about distance. Here's where I put it:
To change the distance, or the mask, or texture, just right click your texture and press Picture properties.
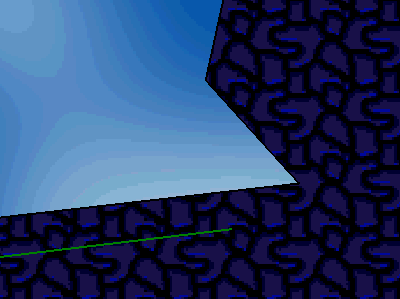
Here's the distance=400:
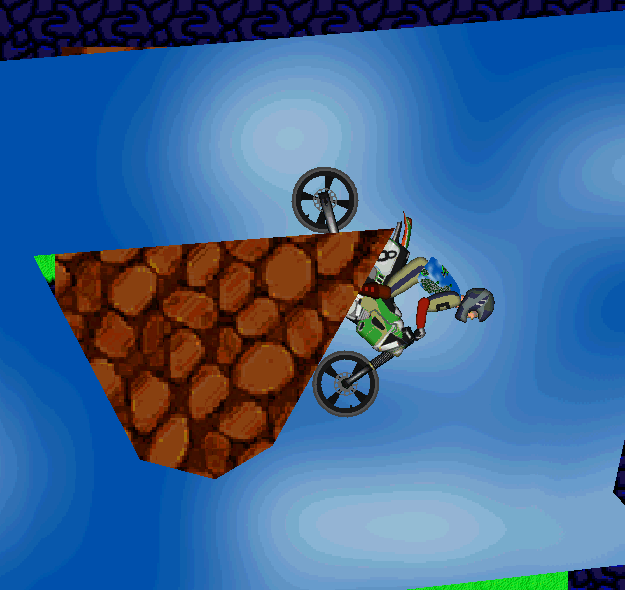
Here's distance=550:
See how the biker appears in front? That's what we want. But the texture is appearing in front of the grass. We don't want that. Grass is drawn at 600. So to make it appear behind the grass, I'll set it to 650.
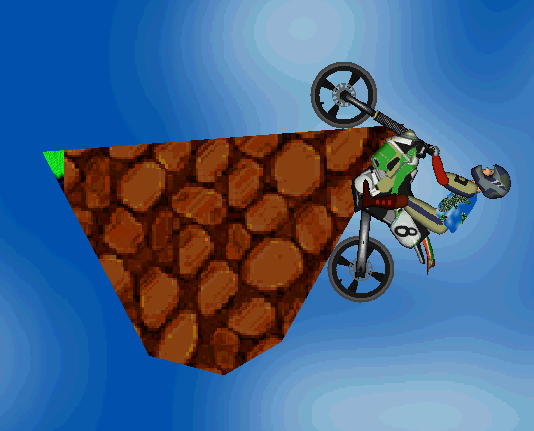
Fantastic. Now you can see my texture is not covering the whole polygon. Let's use another texture to do this. You can just place it again the same way, or you can select the first texture and CTRL+C to copy it.
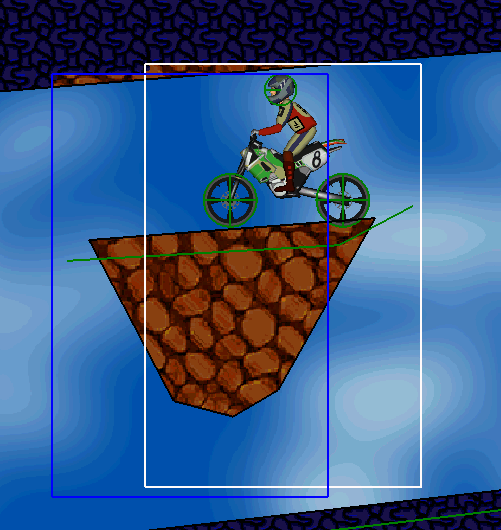
Now we've covered the polygon. But, we have accidentally put some textures on the ceiling. Let's fix that by placing another texture. This time, we will use the ground texture, and we want it to appear in front of the stone1 texture, but behind the player, and behind the grass as well. The distance=645 will work.
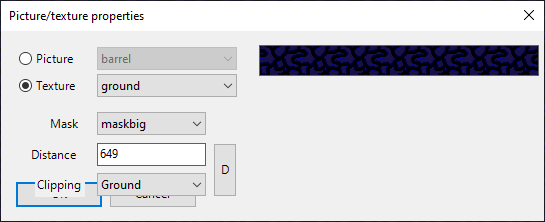
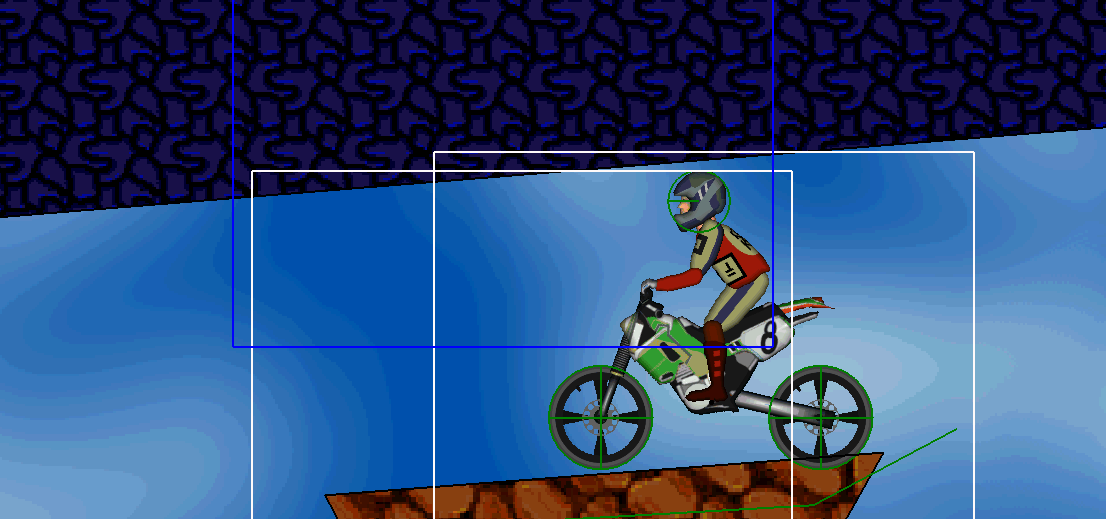
I can't cover the entire problem. Lucky for us, we can change the mask shape to maskhor, which will. See:
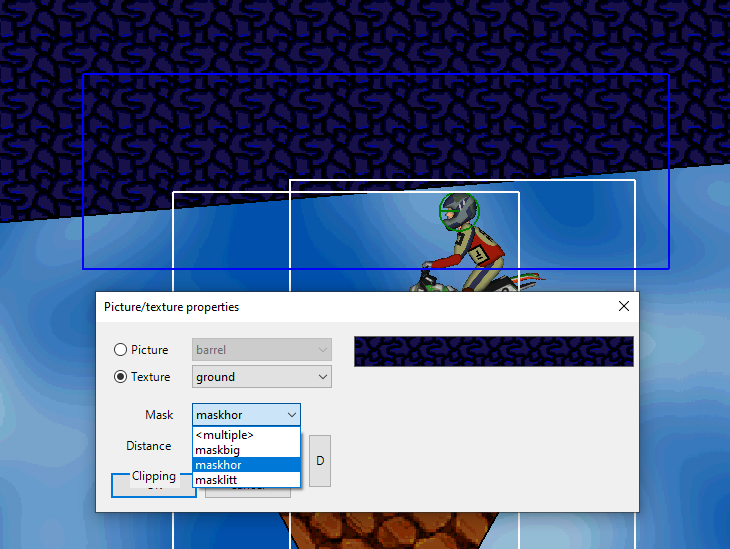
That will cover it up in game
.
Come to think of it, I could have just used maskhor for the stone1 textures.
It's as if I invented a problem just to demonstrate something. Anyways, let's move on.
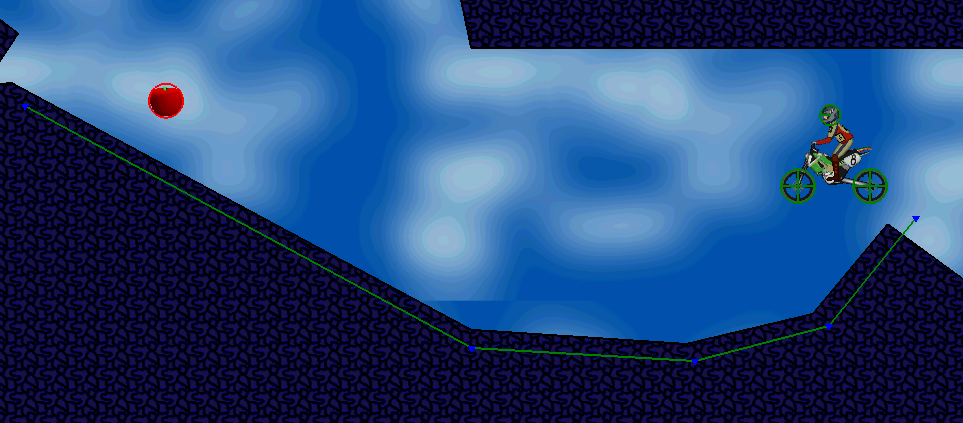
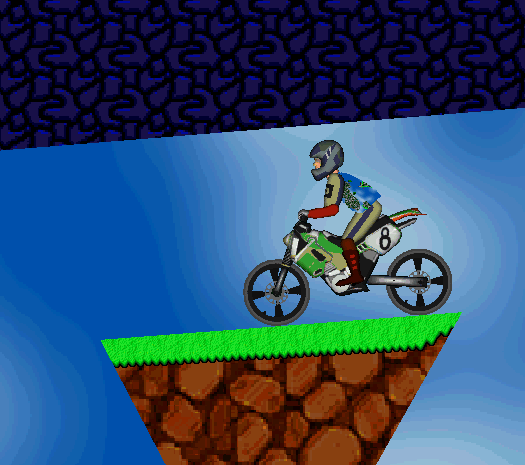
I've moved the player back to the start of the level, and gave it a test. As you can see, you can drive right through the apple.
This happens because the bikers body does not collide with anything, only the wheels and the head. If the apple is just over one wheel high off the ground then the wheel will pass under it and the head will pass over it. Of course, the player could volt and raise their wheel to get the apple, but that's sometimes a bit frustrating. So, I'll show you a simple technique to ensure your apple is not in that sweet (awful) spot.
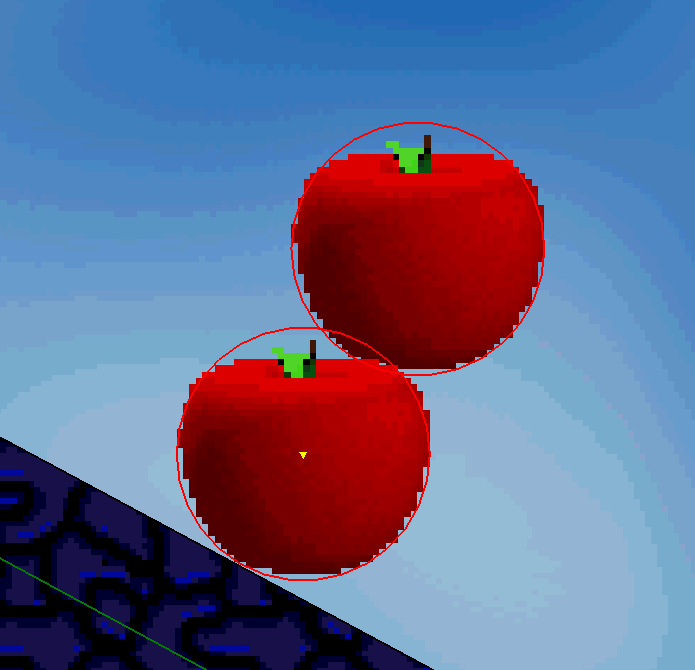
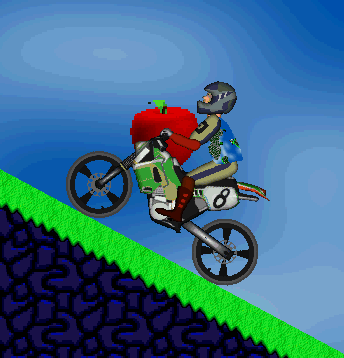
An apple is the same size as the wheel. So, by using another apple to measure, you can ensure that the upper apple will get collected by a wheel driving under it. Then, just remove the measuring apple.
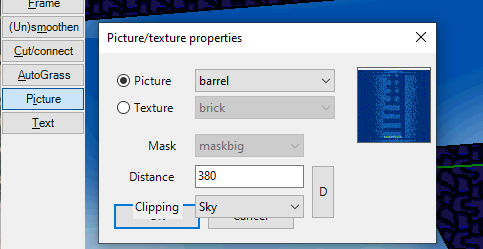
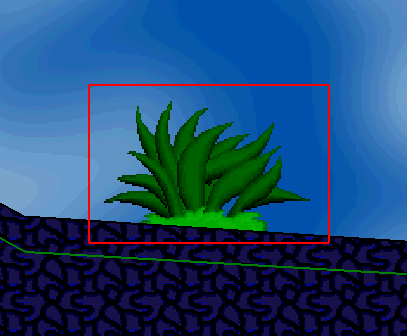
Now let's place a picture. Everyone's favourite, sedge.
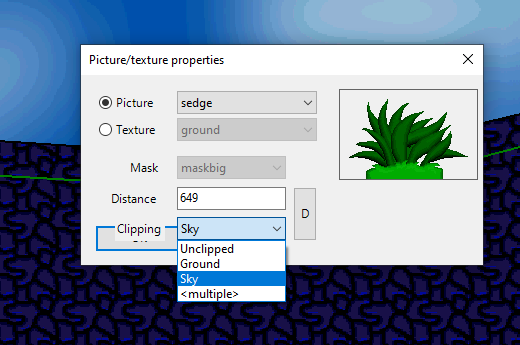
It is important here that I change the clipping to Sky because I want the picture to appear over the sky.
Perfect. Next, we'll place a plantain.
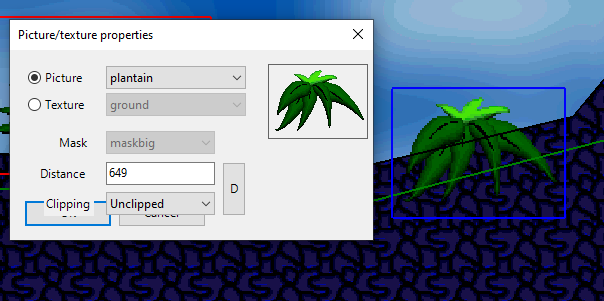
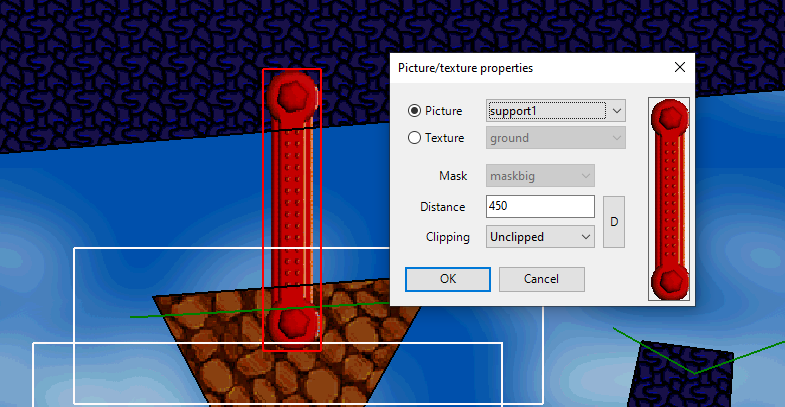
To get the plantain to appear on the ground as well, we use Clipping=Unclipped. Unclipped is like both Sky and Ground together. Let's look at these pictures in game.
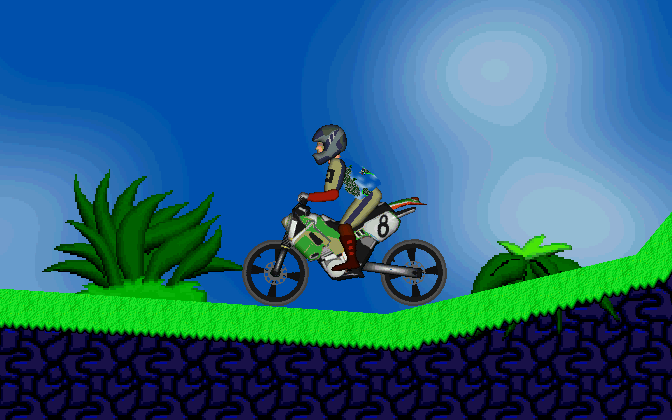
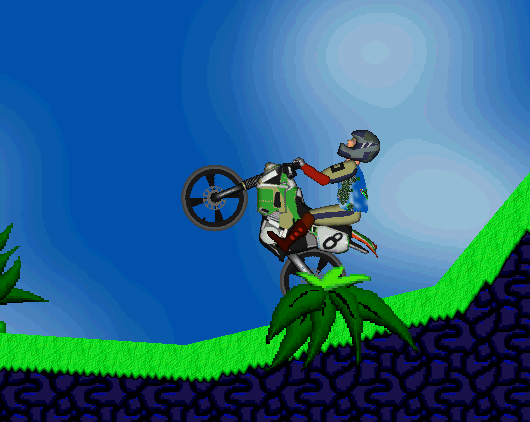
What happened to the plantain? It looks awful. Well, this has to do with distance. Remember, grass is drawn at 600, and our plantain is at 650. That means the grass appears on top. Let's fix that by setting the plantain to distance=550.
Better, but it still looks weird that it's over top the ground but behind the player. We know the player is drawn at 500, so let's set the plantain to 450.
That looks amazing. Keep in mind, if you cover up too much of the ground with pictures then people playing your level will be frustrated. It's very important to see exactly where the lines of the level are, so use this technique with care. I use a few simple rules: only a few pictures appearing in front of the player per level, and never place them on a vertex. If it's in the middle of a straight line then it's simple to know where the line is. Unfortunately, tons of players in elma use a setting that puts all pictures behind the player, but don't let that get you down, make levels that look good for the settings you play with. I play with the classic settings, so I make levels that look good for the classic settings. Knowing how distances work is important when you want to do complicated stuff with textures, see Ramone's HALF2 level pack for some incredible texture tricks in action.
Here's one more picture to finish up.
Done.
Read the Level Designing Etiquette and apply these concepts to your levels.
Level testing with SLE workflow
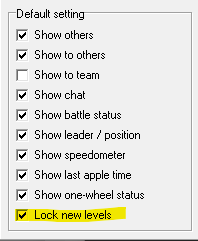
First things first, before starting your level in a battle or submitting it to a contest, it is important you keep it private. To do this ensure that this option is checked in eolconf.exe.
Now, when you're in SLE you can save your level under any name. Most players come up with a name for their levels and then append numbers to it. For example, I'm tej, my levels are tej001, tej002, tej003. Many players also make multiple different packs for different styles of levels, like barry for example, has boobs001 for regular levels and pips001 for pipes. jblaze has FIRST001 for first finish levels. Okay, with that said, try not to use the same name as somebody else. I never would do that, ahem, xxx, oops. Anyways. The easiest way to check if somebody else makes levels under a certain name is to go to https://elmaonline.net/battles and search for it.
When you save your level, you can go into elma and go to the External levels menu and type in the name there and it should come up. A useful tip I use all the time, for when I want to jump to the end of a section, let's say I'm trying to get to tej399. If I type in tej it will bring up tej001, and I don't want to press down 400 times. What I do is type tejz and then it jumps to the level right after the last tej. So I type tejz UP-ARROW ENTER and enter the level. I do this for all battles as well unless the maker puts their numbers in from high to low.
Another useful tip is to use PAGEUP and PAGEDOWN to navigate the menus ingame. It jumps about 20 levels at a time.
If your level is not appearing in to the list, and you're sure you saved it to the right folder (elma/lev) then just re-enter the menu and it should refresh the names.
Now, let's say you load your level, play it, go back to SLE and make a change, then save it again. Now when you play the level it shows the old version in game. Simple fix, just load the next level in the list and then go back to your level. Reloaded. For me that's like ESC ESC UP ENTER ESC ESC DOWN ENTER and it's reloaded. I can type that so fast it's unreal, I've done it ten thousand times.
That's it for SLE. Good luck with the tool, and let your creativity guide your levels.
Making a level in 2000 meant opening up the main menu of elma and going to the Editor button the bottom. This editor is great for many, and served its purpose, but really could have used some quality of life improvements. Luckily for you, it is 2020 and you can use an external tool to make levels. Smibu has created a tool called SLE (Smibu Level Editor) and it is simply fantastic.
To get the tool go to his GitHub page and download it from the Releases tab: https://github.com/Smibu/elmanager.
The benefits of this tool are endless, but significantly it will show you the level with all the graphics and pictures, making placing these things much easier. It also has tools to create different shapes, copy and pasting, resizing, and more. I highly recommend making levels in SLE.
Using SLE to make a level
If you want less instruction, skim through this. Come back to it in a few months and you may be surprised with stuff you don't know!
Start by opening SLE and you'll be shown a new level. A square with the start and finish.
Using your creativity, you're going to design the level. I'll show you the steps to create a simple one, and some tips that will help you along the way, like tools and their hotkeys.
To move your view around the screen use the scroll wheel to zoom in and out, and click your mouse wheel and drag to move your view around. (You can also use arrow keys to move the camera.)
We'll start with the bend tool, it allows you to change the shape of a polygon. If you hover over a polygon and click and drag, it will move the polygon. To bend an edge, you hold SHIFT while you click. I will SHIFT+CLICK the left edge and drag left.
I'm going to do this a few more times and make a bigger area.
Great. Now I will move the flower. You could click and drag the flower to wherever you want it to go. I want to test my level, so I'm actually going to just move it out of the way. I do this almost every time I make a level, because without knowing how big the level will be I might as well get the flower out of the way.
I'm also going to place an apple. To do this click Object on the left side of the screen, or press O. This tool allows you to place Killers, Apples, and Flowers. To swap between them press SPACE. Once you have the apple on your cursor, you can click to place it.
You can see the apple I placed on the right and the one on my cursor as well. To get rid of the Object tool you can press Select on the top left, or S.
Alright, amazing. Now let's learn about the Vertex tool. I want to raise the elman onto a bit of a launch ramp to start the level with some speed. Click Vertex on the left or V. This tool works by selecting an edge and clicking for each new vertex you want to appear. We'll start by clicking on the floor below the biker.
Great, see that red line? That's the section that won't be locked in when you click. So, if you were to click where my mouse is right now, it would act as if I was using the Vertex tool on that red section, next. But, I want to go the other way, so I have to swap the red section to the right side of my mouse. To do this press SPACE.
Great. Now I'll click on all the spots I want to put my verteces. One, two, three.
Now, obviously, the biker is in the ground. We want him to start in the air, so, I'll click and drag on him and to move him.
We've learned how to change the shape of the level using the bend tool, as well as the vertex tool. There are more options, though! Next we'll create a new polygon. To do this, we'll use the Vertex tool again. This time, instead of clicking the ground, click the air and make a shape.
That's beautiful, but what if I want it to be a part of the ground? To do this use the difference tool. These tools can be accessed by opening the Selection menu in the top of the window (not the Select tool on the left).
The hotkeys for these tools are , (comma) and . (period) and ENTER. For difference we use period.
Press period.
Using these tools you can cut shapes out of other shapes and add shapes to shapes. Something you could never accomplish in the internal editor! (I'm not kidding)
Ok let's finish off this level. Only a few more steps.
First I'm going to add another polygon.
Now let's talk about grass.
Grass is created using polygons and then toggling those polygons into grass mode. How it works is not overly complicated, but can take some getting used to. Here's my first grass polygon, but I haven't turned it into grass mode yet. Just look at how I place it.
I put a vertex of the grass polygon below each of the verteces in the ground. Then, I just left the top completely flat. This is important. How the grass tool works is that once it's a grass polygon the LONGEST line is ignored. Watch what happens when I right click my polygon and turn it into grass.
And it becomes:
The top line is gone!
Now, when we see this polygon in game it looks like this.
Note how the grass grows "upwards" from where you put the polygon in the ground. Experiment with this and you can make some cool and beautiful grass! Many elma players don't care for grass, but don't let them get to you, the better your levels look the better they are (this is sarcasm, ArzeniK
Now, I noticed while testing my level that it was really hard due to the polygon at the top of the hill. How do you test your level? Very good question, I have all sorts of tips. I'll get to them shortly.
I reshaped the polygon to look like this.
Now let's add the rest of the grass and move the flower to the left side.
Let's see that in game.
Looks pretty good, but what happened to that one bit of grass that's growing in the side like that? What happens is elma doesn't know what to do because it's simple and you need to tell it how it should be. There's two good options here. I'll go over the easier one.
I've just moved the grass back. You could just click and drag the vertex, but you may want to ensure it stays at the same distance from the ground as before. To do this, using the Select tool, click the vertex and hold SHIFT while you drag it. You'll notice it only moves along one line, as if it's snapped into place. This is a great tool for all sorts of things! Anyways, here's how it looks in game.
Interested in a different way to fix this problem? See Advanced tips
That'll do. Almost done. Let's add a texture to the floating block.
Click Picture on the left, then click on the level view to make this menu appear.
This menu allows you to place pictures and textures. First we'll do a texture. Select the Texture radio button and then choose stone1.
The Distance value is important, it determines which stuff appears on top of which stuff. The larger the number is, the farther back it will appear. Or, in different words, the smallest number appears on top, hiding the stuff with larger numbers. An important note is the biker appears at 500, so anything above 500 will appear behind him.
Quickly, let's just place a texture and then get back to talking about distance. Here's where I put it:
To change the distance, or the mask, or texture, just right click your texture and press Picture properties.
Here's the distance=400:
Here's distance=550:
See how the biker appears in front? That's what we want. But the texture is appearing in front of the grass. We don't want that. Grass is drawn at 600. So to make it appear behind the grass, I'll set it to 650.
Fantastic. Now you can see my texture is not covering the whole polygon. Let's use another texture to do this. You can just place it again the same way, or you can select the first texture and CTRL+C to copy it.
Now we've covered the polygon. But, we have accidentally put some textures on the ceiling. Let's fix that by placing another texture. This time, we will use the ground texture, and we want it to appear in front of the stone1 texture, but behind the player, and behind the grass as well. The distance=645 will work.
I can't cover the entire problem. Lucky for us, we can change the mask shape to maskhor, which will. See:
That will cover it up in game
.
Come to think of it, I could have just used maskhor for the stone1 textures.
It's as if I invented a problem just to demonstrate something. Anyways, let's move on.
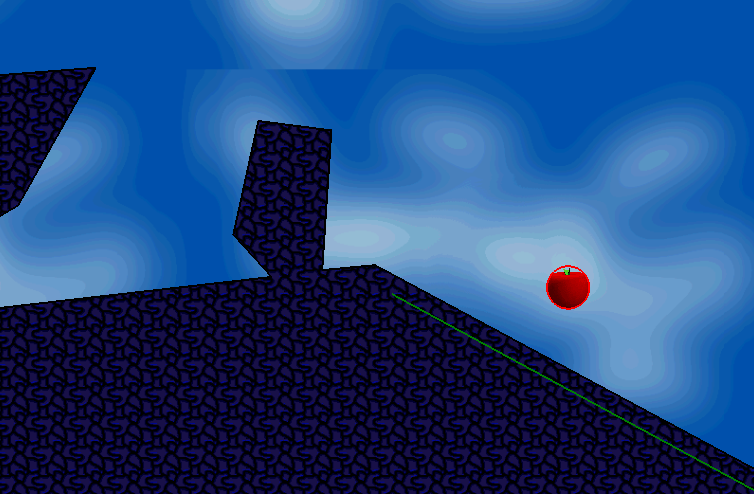
I've moved the player back to the start of the level, and gave it a test. As you can see, you can drive right through the apple.
This happens because the bikers body does not collide with anything, only the wheels and the head. If the apple is just over one wheel high off the ground then the wheel will pass under it and the head will pass over it. Of course, the player could volt and raise their wheel to get the apple, but that's sometimes a bit frustrating. So, I'll show you a simple technique to ensure your apple is not in that sweet (awful) spot.
An apple is the same size as the wheel. So, by using another apple to measure, you can ensure that the upper apple will get collected by a wheel driving under it. Then, just remove the measuring apple.
Now let's place a picture. Everyone's favourite, sedge.
It is important here that I change the clipping to Sky because I want the picture to appear over the sky.
Perfect. Next, we'll place a plantain.
To get the plantain to appear on the ground as well, we use Clipping=Unclipped. Unclipped is like both Sky and Ground together. Let's look at these pictures in game.
What happened to the plantain? It looks awful. Well, this has to do with distance. Remember, grass is drawn at 600, and our plantain is at 650. That means the grass appears on top. Let's fix that by setting the plantain to distance=550.
Better, but it still looks weird that it's over top the ground but behind the player. We know the player is drawn at 500, so let's set the plantain to 450.
That looks amazing. Keep in mind, if you cover up too much of the ground with pictures then people playing your level will be frustrated. It's very important to see exactly where the lines of the level are, so use this technique with care. I use a few simple rules: only a few pictures appearing in front of the player per level, and never place them on a vertex. If it's in the middle of a straight line then it's simple to know where the line is. Unfortunately, tons of players in elma use a setting that puts all pictures behind the player, but don't let that get you down, make levels that look good for the settings you play with. I play with the classic settings, so I make levels that look good for the classic settings. Knowing how distances work is important when you want to do complicated stuff with textures, see Ramone's HALF2 level pack for some incredible texture tricks in action.
Here's one more picture to finish up.
Done.
Read the Level Designing Etiquette and apply these concepts to your levels.
Level testing with SLE workflow
First things first, before starting your level in a battle or submitting it to a contest, it is important you keep it private. To do this ensure that this option is checked in eolconf.exe.
Now, when you're in SLE you can save your level under any name. Most players come up with a name for their levels and then append numbers to it. For example, I'm tej, my levels are tej001, tej002, tej003. Many players also make multiple different packs for different styles of levels, like barry for example, has boobs001 for regular levels and pips001 for pipes. jblaze has FIRST001 for first finish levels. Okay, with that said, try not to use the same name as somebody else. I never would do that, ahem, xxx, oops. Anyways. The easiest way to check if somebody else makes levels under a certain name is to go to https://elmaonline.net/battles and search for it.
When you save your level, you can go into elma and go to the External levels menu and type in the name there and it should come up. A useful tip I use all the time, for when I want to jump to the end of a section, let's say I'm trying to get to tej399. If I type in tej it will bring up tej001, and I don't want to press down 400 times. What I do is type tejz and then it jumps to the level right after the last tej. So I type tejz UP-ARROW ENTER and enter the level. I do this for all battles as well unless the maker puts their numbers in from high to low.
Another useful tip is to use PAGEUP and PAGEDOWN to navigate the menus ingame. It jumps about 20 levels at a time.
If your level is not appearing in to the list, and you're sure you saved it to the right folder (elma/lev) then just re-enter the menu and it should refresh the names.
Now, let's say you load your level, play it, go back to SLE and make a change, then save it again. Now when you play the level it shows the old version in game. Simple fix, just load the next level in the list and then go back to your level. Reloaded. For me that's like ESC ESC UP ENTER ESC ESC DOWN ENTER and it's reloaded. I can type that so fast it's unreal, I've done it ten thousand times.
That's it for SLE. Good luck with the tool, and let your creativity guide your levels.
Last edited by tej on 8 Aug 2020, 20:49, edited 9 times in total.
Re: Guide to Level Making and Battle Starting for new players
Starting battles
Starting battles
Starting a battle was a bit stressful for me. What time do you pick? When do you start it?
Here's the thing, people will absolutely dislike your levels. You can't please everyone. I don't mean everyone will, but someone will. Don't let people get you down. Make levels that make you happy, and start them, and enjoy watching people play. Some people are known haters, and you will learn who they are, and you can ignore them. Don't get me wrong 99% of the community is lovely and supportive, but they are usually quiet. So don't let people talk you down. Just keep making levels, practicing, battling them. If you're putting effort into your levels, that's all we can ask for.
Or, maybe everyone will love your levels and you'll never hear a negative comment! I wish you luck. I started by making some funky levels that were a bit jarring and shocking, so I got a lot of these comments.

tej070.lev
Battle time
Unless your level is absolute lazy trash, give people at least 15 minutes to play it. If your level is short and easy, 60 minutes is probably too long. I start levels based on a factor of how long they are, how hard they are, and how much effort I put in to them. The level that I made in this tutorial is really short, and medium to low effort (other than taking all the screenshots!) so I'd put it at 15 minimum to 25 minutes maximum.
The worst thing you can do is cut your battle off in the middle of an epic war, right? So give your levels a bit more time rather than a bit less, if you think it's a good level.
When to start a battle
Most players are from Europe, and are up around after work to bedtime. So if you want maximum playage, start it then. I'm from Canada, so for me that's midday. I start a lot of battles at midnight, and rarely is anyone around. So mostly I save them for peak hours these days.
Don't start a battle in the middle of a contest. If you are asked to unqueue a battle because it's a bad time, it's usually best to just agree and start it later. This is rare, so just start your battles! If you know there's a contest, hold off.
Sundays are the most popular day for players, and the best time for contests.
Getting rights to start a battle
If you're new you'll need to ask for permission. There is no requirements, you will get your permission. If you abuse it maybe they'll take it away. I've never seen someone declined nor have I seen anyone lose their rights.
You need elevated permissions for certain battle types, but if your a new mapper, stick to normal for a bit and then you'll know more about asking for this.
Battle settings
To start a battle you use the startballe.exe tool.
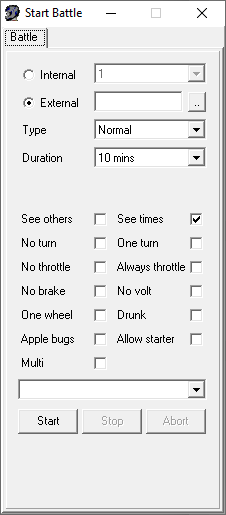
This is the default when you open it. Here's what you do:
1. Select your level with the External [..] button. Don't start Internal battles, pretty sure it's just never allowed.
2. Type is Normal, stick with this for your first level.
3. Select your time.
There are tons of funny options to select below, feel free to start a No volt battle once you know what it means.
The options you should be concerned with are See others and See times.
Use See others if your level is a pipe or special level. Most players believe competition is greatest when you can't see your opponents, but pipes are an exception.
See times is default, don't turn it off unless you want to have a battle where people don't know how well they're doing until it's over. I don't recommend this for all your battles, but it's fun sometimes.
Allow starter is frowned upon. You can try your luck with it, but it's not really allowed.
Pressing Start
Are all your settings set up properly? Press Start.
As the battle starter you are able to see everybody playing, even if See others is disabled! It's a fun experience, watching people play your level. I highly suggest it.
Careful, everybody playing is able to see you too, battle starter! This is a weird feature, we know. If you want to play your level without giving away the styles during the battle, you can use the hotkey Shift+F1 to toggle whether people can see you.
Starting battles
Starting a battle was a bit stressful for me. What time do you pick? When do you start it?
Here's the thing, people will absolutely dislike your levels. You can't please everyone. I don't mean everyone will, but someone will. Don't let people get you down. Make levels that make you happy, and start them, and enjoy watching people play. Some people are known haters, and you will learn who they are, and you can ignore them. Don't get me wrong 99% of the community is lovely and supportive, but they are usually quiet. So don't let people talk you down. Just keep making levels, practicing, battling them. If you're putting effort into your levels, that's all we can ask for.
Or, maybe everyone will love your levels and you'll never hear a negative comment! I wish you luck. I started by making some funky levels that were a bit jarring and shocking, so I got a lot of these comments.
tej070.lev
Battle time
Unless your level is absolute lazy trash, give people at least 15 minutes to play it. If your level is short and easy, 60 minutes is probably too long. I start levels based on a factor of how long they are, how hard they are, and how much effort I put in to them. The level that I made in this tutorial is really short, and medium to low effort (other than taking all the screenshots!) so I'd put it at 15 minimum to 25 minutes maximum.
The worst thing you can do is cut your battle off in the middle of an epic war, right? So give your levels a bit more time rather than a bit less, if you think it's a good level.
When to start a battle
Most players are from Europe, and are up around after work to bedtime. So if you want maximum playage, start it then. I'm from Canada, so for me that's midday. I start a lot of battles at midnight, and rarely is anyone around. So mostly I save them for peak hours these days.
Don't start a battle in the middle of a contest. If you are asked to unqueue a battle because it's a bad time, it's usually best to just agree and start it later. This is rare, so just start your battles! If you know there's a contest, hold off.
Sundays are the most popular day for players, and the best time for contests.
Getting rights to start a battle
If you're new you'll need to ask for permission. There is no requirements, you will get your permission. If you abuse it maybe they'll take it away. I've never seen someone declined nor have I seen anyone lose their rights.
You need elevated permissions for certain battle types, but if your a new mapper, stick to normal for a bit and then you'll know more about asking for this.
Battle settings
To start a battle you use the startballe.exe tool.
This is the default when you open it. Here's what you do:
1. Select your level with the External [..] button. Don't start Internal battles, pretty sure it's just never allowed.
2. Type is Normal, stick with this for your first level.
3. Select your time.
There are tons of funny options to select below, feel free to start a No volt battle once you know what it means.
The options you should be concerned with are See others and See times.
Use See others if your level is a pipe or special level. Most players believe competition is greatest when you can't see your opponents, but pipes are an exception.
See times is default, don't turn it off unless you want to have a battle where people don't know how well they're doing until it's over. I don't recommend this for all your battles, but it's fun sometimes.
Allow starter is frowned upon. You can try your luck with it, but it's not really allowed.
Pressing Start
Are all your settings set up properly? Press Start.
As the battle starter you are able to see everybody playing, even if See others is disabled! It's a fun experience, watching people play your level. I highly suggest it.
Careful, everybody playing is able to see you too, battle starter! This is a weird feature, we know. If you want to play your level without giving away the styles during the battle, you can use the hotkey Shift+F1 to toggle whether people can see you.
Last edited by tej on 27 May 2020, 19:23, edited 5 times in total.
Re: Guide to Level Making and Battle Starting for new players
Advanced tips in SLE
Fixing a grass error by putting a texture on top of it
Remember this problem?
You can fix this by putting a texture on top of it.
This has the benefit of allowing you to keep the grass close to the corner without having it appear on the top bit. The perfect distance for this texture is somewhere between 500 and 600, larger than 500 to be behind the player and smaller than 600 to be in front of the grass.
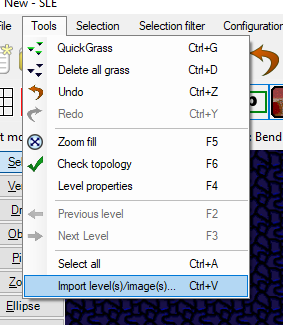
Importing images
You can import images into your levels by using this tool.
Fixing a grass error by putting a texture on top of it
Remember this problem?
You can fix this by putting a texture on top of it.
This has the benefit of allowing you to keep the grass close to the corner without having it appear on the top bit. The perfect distance for this texture is somewhere between 500 and 600, larger than 500 to be behind the player and smaller than 600 to be in front of the grass.
Importing images
You can import images into your levels by using this tool.


Re: Guide to Level Making and Battle Starting for new players
i still prefer internal editor but nice guide 
39:37,91
-
insane guy

- Kuski
- Posts: 1673
- Joined: 22 May 2002, 20:53
- Contact:
Re: Guide to Level Making and Battle Starting for new players
yes, very good, thanks! still too lazy for the few extra klicks to test lev.
"Every night, me go to sleep, me have wet dream..."

Re: Guide to Level Making and Battle Starting for new players
Well done, tej! 
[13:22:24] (
 bEAT) blaz super pro
[17:06:15] (
 Ramone) ok I suckj. blaz rules
Re: Guide to Level Making and Battle Starting for new players
Sick nice tej!
[i cruise, i lev, i live]
Re: Guide to Level Making and Battle Starting for new players
Thanks, guys.
I want to put this on Steam, and still plan to do so, but I took a quick look at the guide feature there and it forces you to upload the images to embed them on the guide. That would be fine, but you have to do it one at a time, which is the stupidest nonsense I've seem from valve in a while. Anyways, I'll get to that eventually.
I want to put this on Steam, and still plan to do so, but I took a quick look at the guide feature there and it forces you to upload the images to embed them on the guide. That would be fine, but you have to do it one at a time, which is the stupidest nonsense I've seem from valve in a while. Anyways, I'll get to that eventually.

Re: Guide to Level Making and Battle Starting for new players
wow niec topic
should add this thing imo

should add this thing imo